[Printer Select] Tab
This tab is used for selecting a printer and specifying the network settings.
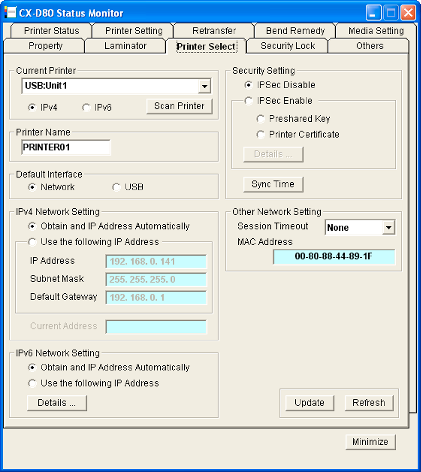
Current Printer
Selecting a printer
Selecting a printer from the pull-down menu switches the display to the current status of the selected printer.
Searching a printer
Clicking the [Scan Printer] button displays the search results in the pull-down menu.
Cautions
The printer connected via Ethernet (LAN) may not be searchable if IPSec is enabled. In this case, search the printer again after registering the printer.
Close
Registering a printer
You can enter the IP address in the pull-down menu to register the printer for the IP address in the menu.
Memo
Registered IP addresses will be stored in the memory even after exiting the status monitor.
The printer cannot be registered if the IP address format is incorrect.
Close
Deleting a printer
You can select a printer and delete it from the pull-down menu.
Printer Name
For setting the name of the selected printer.
You can input up to 10 ASCII characters. Symbol characters may not be displayed on the operation panel.
Default Interface
For setting the interface during startup. For Ethernet (LAN) connection, the settings are displayed in the read-only mode, and they cannot be changed.
Cautions
Regardless of the default interface setting, priority is given to USB if a USB cable is connected.
To assign priority to the USB connection, enable the operation of the computer and USB hub.
Close
Network
Enables you to print via the Ethernet (LAN) connection.
USB
Enables you to print via the USB connection.
IPv4 Network Setting
For setting items related to Ethernet (LAN). For Ethernet (LAN) connection, the settings are displayed in the read-only mode, and they cannot be changed.
Cautions
Determine the network setting items according to the instructions of the network administrator for the location where the printer unit is installed.
Other network devices may be affected if the network setting is incorrect.
When only USB connection is used, there is no need to specify the network setting.
Close
Obtain and IP Address Automatically
Values such as the IPv4 address can be automatically acquired from the DHCPv4 server.
If the DHCPv4 server is not found, settings in the [Use the following IP Address] will be applied.
If the DHCPv4 server is not found, settings in the [Use the following IP Address] will be applied.
Memo
For values automatically acquired from the DHCPv4 server, only the IP address is displayed in [Current Address].
Values such as the IP address may change regularly according to the DHCPv4 server settings.
If you want to use a static IP address for application software such as the printer driver, set to [Use the following IP Address].
Close
Use the following IP Address
Uses a static IP address. Set the [IP Address], [Subnet Mask], and [Default Gateway].
Current Address
Displays the IPv4 address.
IPv6 Network Setting
For setting items related to Ethernet (LAN). For Ethernet (LAN) connection, the settings are displayed in the read-only mode, and they cannot be changed.
Cautions
Determine the network setting items according to the instructions of the network administrator for the location where the printer unit is installed.
Other network devices may be affected if the network setting is incorrect.
When only USB connection is used, there is no need to specify the network setting.
Close
Obtain and IP Address Automatically
Values such as the IPv6 address can be automatically acquired from the DHCPv6 server.
If the DHCPv6 server is not found, settings in the [Use the following IP Address] will be applied.
If the DHCPv6 server is not found, settings in the [Use the following IP Address] will be applied.
Memo
For values automatically acquired from the DHCPv6 server, only the IP address is displayed when you click [Details...].
Values such as the IP address may change regularly according to the DHCPv6 server settings.
If you want to use a static IP address for application software such as the printer driver, set to [Use the following IP Address].
Close
Use the following IP Address
You can specify a static IP address as follows.
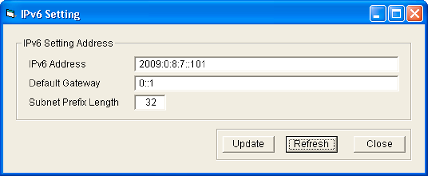
Click [Details...] to set [IPv6 Address], [Default Gateway], and [Subnet Prefix Length].
Click [Details...] to set [IPv6 Address], [Default Gateway], and [Subnet Prefix Length].
Security Setting
For setting items related to the IPSec of Ethernet (LAN). The settings are displayed in the read-only mode when connection is established via Ethernet (LAN). The settings cannot be changed.
Cautions
Determine the setting items according to the instructions of the network administrator for the location where the printer unit is installed.
Encrypted communication cannot be established if the security settings are incorrect.
When only USB connection is used, there is no need to specify the security settings. USB connection does not support encrypted communication.
It is not possible to specify the security settings for the printer unit without using a USB connection.
For details on downloaded files to be used for the security settings, refer to "IPSec".
Close
IPSec Disable
Communication is enabled only when IPSec is not used. The default setting is [IPSec Disable].
IPSec Enable
Communication is established using IPSec. After [Details...] setting is complete, [Preshared Key] or [Printer Certificate] is selected.
Memo
Selecting [IPSec Enable] enables [Details...].
Clicking the [Preshared Key] or [Printer Certificate] button does not enable you to change the settings.
Close
Encrypted communication by IPSec
Refer to the table below on whether encrypted communication by IPSec can be performed.
| Printer Settings | IPSec Policy of PC | ||
|---|---|---|---|
|
Security Required |
Request for Security |
Not Protected |
|
|
“Disable IPSec” |
Communication disabled |
Normal communication |
Normal communication |
|
“Enable IPSec” (When authentication fails) |
Communication disabled |
||
|
“Enable IPSec” (When authentication is successful) |
Encrypted communication |
Encrypted communication |
Communication disabled |
- [Details...] button
Displays the [IPSec Setting] screen.
Downloads files required for IPSec authentication to the printer.
Downloads files required for IPSec authentication to the printer.
File settings required for preshared key authentication
A preshared key file is required for preshared key authentication.
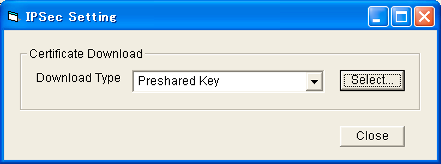
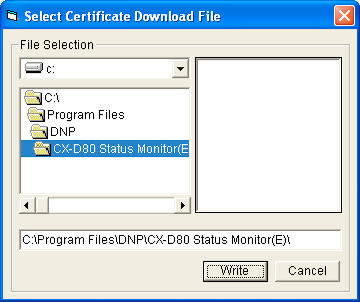
- IPSec setting for the printer is complete after closing the screen.
File settings required for certificate authentication
Certificate files for the printer as well as from the certification authority are required for certificate authentication.
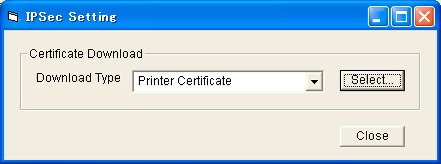

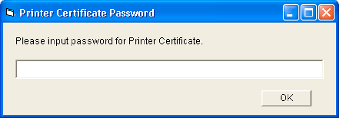
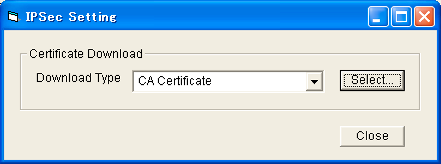

- IPSec setting for the printer is complete after closing the screen.
Sync Time
clicking the [Sync Time] button sends out the current time of the PC to the printer. You can specify this setting via USB or network connection.
Other Network Setting
Session Timeout
For setting the time interval before disconnecting automatically if there is no communication after printing connection is established. The default setting is [None].
MAC Address
Displays the MAC address of the printer.
[Update] button
Applies the selected value to the printer.
[Refresh] button
Displays the printer settings on the screen.
